
Replacing a Blower Motor
Please follow these steps to replace a blower motor from the Airskid of a BioDryer.
Personal Protective Equipment
- Both Rubber dipped work gloves AND Nitrile gloves


Required Tools
- Phillips head screwdriver
- Tongue and groove pliers
- Crowbar
- (1) 6mm socket
- (1) 8mm socket
- (1) 13mm wrench
- (2) 17mm wrenches
- (2) 19mm wrenches
- (1) 19mm socket
- (1) impact w/ 1’ long extension
- Voltage multimeter
- Bearing extractor
- Steel mallet & 2”x2”x1’ piece of wood
- Chain fall
- 4’ strut channel
- (2) C clamps
Consumables
- Grease or aerosol lubricant
- (1) Blower Motor
Timeframe
- Estimated total of 3 man hours to complete
Procedure
-
Initiate LOTTO Procedure:
Terminate power to the biodryer by turning the main switch on the electrical panel to the “OFF” position. -
Confirm the Motor is De-energized:
With an 8mm socket wrench, remove the terminal box cover. Using a multimeter, test the 3 phases in the terminal box, ensuring there is no current present. -
Disconnect Cables from Terminals:
After confirmation of de-energized unit, use a 6mm socket wrench and Phillips head screwdriver to remove the 3 phases and ground from the terminal box. -
Remove Conduit:
Once cables are disconnected, use the pliers to remove the conduit from the terminal box. -
Remove Support Collars:
Using (2) 19mm wrenches, remove both pipe support collars between the biodryer air outlet and outlet blower. -
Remove Nuts:
Using a 13mm wrench, remove the (8) nuts and washers fixing the air pipe flange to the body of the blower. Pull the pipe away from the blower body until the flange is clear from the bolts and let it rest below. (see Figure 1)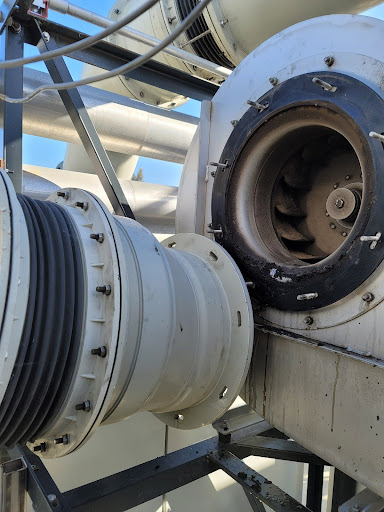
Figure 1 -
Remove Shaft Bolt:
Using a 19mm impact with an extension, remove the single bolt fixing the internal blades to the motor shaft. Use a crowbar to wedge the blades to prevent rotation during removal. (see Figure 2)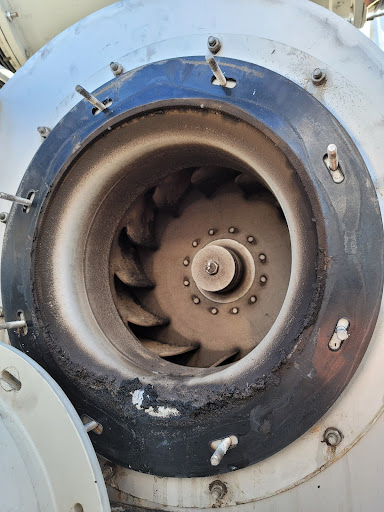
Figure 2 -
Remove Motor Footing Hardware:
Using (2) 17mm wrenches, remove the (4) bolts, nuts, and lock washers mounting the motor footing to the blower housing structure. -
Remove Motor Shaft:
Use a bearing removal tool to extract the shaft from inside the blower body. Alternatively, use a steel mallet and a piece of 2x2 wood to hammer the shaft out of the blower body. Use a generous amount of WD40 to help with removal if needed. -
Remove Motor:
Fix a strut channel with C-clamps perpendicular to steel beams above the motor. Run a strap through both eye bolt anchors on the motor. Rig up a chain fall to the strut channel and hook it to the strap on the motor, then slowly lower the motor to the ground. (see Figure 3)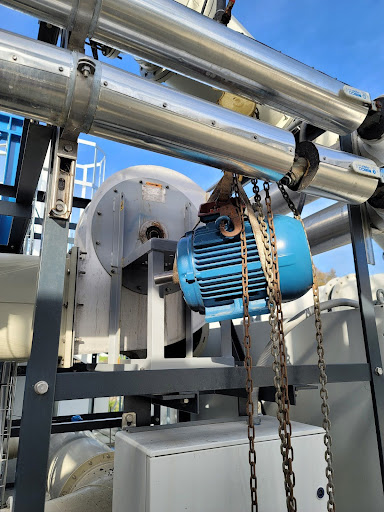
Figure 3 -
Hoist New Motor onto Blower Mount:
Using the chain fall, hoist the new motor into position on the motor mounting surface. -
Fix Motor Shaft into Blower Blade Wheel:
Apply a light coat of grease to the shaft. Line up the shaft with the key to the key slot on the blade wheel of the blower. Using a steel mallet and piece of wood, hammer the blower blade wheel back onto the shaft. Once the shaft bolt is able to be threaded, use a 19mm impact to securely fix the shaft into position. -
Secure Motor Footing to Blower Mount:
Using (2) 17mm wrenches, re-install the (4) bolt assemblies to fix the motor footing to the blower motor mount. -
Fix Air Pipe Back to Blower Body:
Re-install the air pipe back onto the fixed blower bolts. Using a 13mm wrench, fasten the nuts and washers. Using (2) 19mm wrenches, re-install the air pipe support collars. -
Rewire Phases and Ground to Terminal Box:
Using a 6mm socket wrench and Phillips head screwdriver, wire back up the 3 phases and ground wire to the terminal box. Use the pliers to fix the conduit securely to the terminal box. Fix the terminal box cover back onto the motor using an 8mm socket wrench. -
Remove LOTTO:
Re-energize the biodryer by turning the main switch on the electrical panel to the “ON” position. Reset the 24v components by pressing the blue button until the light is no longer illuminated. -
Exercise the Motor:
Manually exercise the motor to ensure it's rotating in the correct direction.
Figures
Figure #1
Figure #2
Figure #3